The required setup of the backend server when starting out on a new project can sometimes be complex and time consuming. In this article we will show an easy way to get a REST server going, using Java and Spring Boot.
Introduction
At WATA Factory, we have been using Java quite extensively both in our clients’ projects as well as for internal projects. Despite (or maybe even because of) its already proud age of 25 years, Java is still widely used.
While there are generally better, non-java-based alternatives available for the frontend, such as Angular (using Typescript), React (using JavaScript) or Flutter (using Dart), Java is still often the best choice for backend development, and it is used extensively in projects of all kinds. For big, enterprise-level applications, it is still almost the industry standard.
Of course, we all stand on the shoulders of giants, and nobody would be so crazy as to try to develop an entire application from scratch. Instead, we use application frameworks. In Java, there are quite a few. Which one is best suited depends entirely on the project requirements:
- Jakarta EE (formerly Java EE) – Large-Scale enterprise apps
- Hibernate – a Java Object-Relationship-Mapping framework that works with JPA and simplifies working with databases
- Quarkus – Cloud and Microservices, very lightweight
- Spring framework – Probably the most popular, suited for Microservices, REST-Apps
In this article we will look at Spring, or, more precisely, Spring Boot. It is built on top of the Spring framework and has been designed to simplify the development of standalone, production-ready applications.
Why Spring Boot?
When starting to develop a new application from scratch, traditionally with Java EE or Spring (without the Boot) a lot of configuration and boiler plate code was necessary. Manage dependencies, make sure everything works together, and then there is still the topic of deploying the application on a suitable application server, which can be very complex. For a big enterprise application, such extensive configuration and fine-grained control might actually be needed, but for smaller projects, this seems like a lot of overhead.
This is where Spring Boot comes in. It was designed to simplify the development of standalone, production-ready Spring applications. It does so by removing the need for complex configuration, applying the principle of “Convention over Configuration”.
Convention over Configuration
This principle means that Spring Boot tries to provide sensible defaults for things that would in other cases have to be configured manually. For example, unless you configure it differently, Spring Boot already includes an embedded Tomcat server, no configuration at all needed.
It also auto-configures components based on default values and classpath dependencies, thus considerably reducing the boilerplate code one must write to get an application off the ground and start being productive.
The Spring Boot Initializr
Another feature of Spring Boot that helps to get started as fast as possible is the Spring Boot Initializr. This web-based tool allows configuring and generating an entire project and eliminates the need for manual setup and provides a ready-to-run project structure.
Creating a Demo Application
Let us now create a working Spring boot application using the initializr
Go to https://start.spring.io/
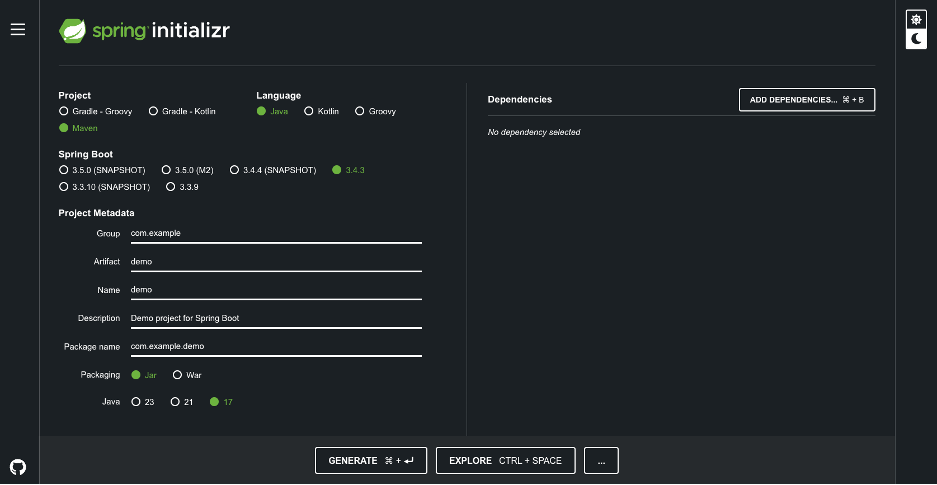
- Choose your project management. Since we are using Java, we will go with Maven (Gradle also works with Maven – in the end it is probably a question of personal taste. While Gradle is less verbose and arguably more powerful, Maven is “tried and tested” and offers a plugin for almost any situation imaginable)
- Choose the language. We will choose Java
- Select the Spring Boot Version. This defaults to the current stable version, which is usually the best choice.
- Enter your metadata: For this simple demo, we will go with the defaults
- Choose ‘Jar’ as your packaging. This means that the compiled application will be available as an executable jar.
- Finally, select the Java version. You should use the one that you have installed on your system
The most interesting part is on the right, hidden behind the button “Add Dependencies”. Clicking here lets you add all kinds of dependencies without having to dive into maven central and searching by yourself. Each one comes with a small description. The list includes developer tools, web-related dependencies, databases (both SQL and Non-SQL), cloud, security, templating for server-side rendering, messaging, testing, AI and more.
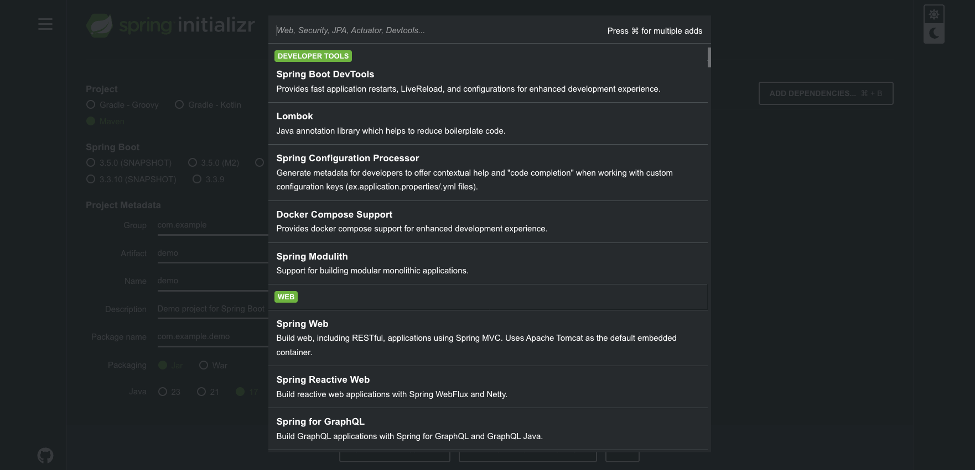
For our little demo we will select the following:
- Spring Web: Lets us create REST endpoints easily and provides the embedded Apache Tomcat as the default container
- Spring Boot DevTools: Offers some quality-of-life tools like live reload during development and faster startup
- Lombok: Saves writing a lot of boilerplate code for POJOs
- Spring Data JPA: Database connectivity
- H2 Database: Create a simple in-memory database for this project.
Now click on “generate” to download a Zip-file. Then unzip the file and just open it with the IDE of your choice. For this demo, we will use IntelliJ.
The initializr should have created the following files (there should be some other folders and files, but these are the important ones):
- demo/src/main/java/com/example/demo/DemoApplication.java:
The main executable for the app. Execute this file to start the app. - Demo/src/main/resources/application.properties:
The main configuration file for the app. While this is a standard java properties file, you could also use YAML instead. - pom.xml:
All dependencies and build plugins are managed here.
Creating the First Endpoint
With the setup out of the way, we can now create our first endpoint. This one is going to be very basic and only displays text.
First, create new Java file in the same folder as DemoApplication.java and name it HelloWataController.java. Now add the following code:
package com.example.demo;

import org.springframework.web.bind.annotation.GetMapping;
import org.springframework.web.bind.annotation.RequestMapping;
import org.springframework.web.bind.annotation.RestController;

@RestController
@RequestMapping("/hello")
public class HelloWataController {

    @GetMapping
    public String sayHello() {
        return "Hello WATA Factory!";
    }
}
And that is all! Now run the application by executing DemoApplication.java. You might have to execute the Maven clean and install jobs first.
Then open your browser and navigate to http://localhost:8080/hello. Unsurprisingly, you should see ”Hello WATA Factory!” displayed in your browser window.
Now, this endpoint is not very useful, but it serves to show with how few actual lines of code you can set up a working web application in Spring Boot.
Adding a Database
In the next step, we will add database support. That is why we added the H2 Database pack in the Initializr, after all. This database is only in-memory and will therefore be deleted after closing the application, but the setup process is the same for any kind of SQL-database. For this little demo we will read from a database of books.
First, we need to configure the DB connection in our application.properties file. Add the following lines to the file:
spring.application.name=demo

spring.h2.console.enabled=true
spring.datasource.url=jdbc:h2:mem:testdb
spring.datasource.driverClassName=org.h2.Driver
spring.datasource.username=sa
spring.datasource.password=password
spring.jpa.database-platform=org.hibernate.dialect.H2Dialect
spring.jpa.hibernate.ddl-auto=update
Defining the Entity class
Next, we will create our entity POJO class. Create a package called “book” below “com.example.demo”, and in that package create a new file called Book.java. Add the following code the newly created class:
@Entity
@Getter
@Setter
public class Book {
    @Id
    @GeneratedValue(strategy = GenerationType.IDENTITY)
    private Long id;
    private String title;
    private String author;
}
This is our entity class that models the database entries for the ”book”-table, as denoted by the “@Entity” annotation.
The “@Getter” and “@Setter” annotations come from the Lombok package we added in the initializr and add getters and setters for the attributes at compile time, so that we do not need to add them manually.
The other two annotations define which of the attributes is the primary key for the entity, and how it is created.
In Spring Boot terms, the class that reads and writes entities from and to the database is called a repository. Therefore, we need to create a repository class for our Book-entity. Let’s call it “BookRepository.java” and put it right next to our entity class. It has only one line:
public interface BookRepository extends JpaRepository<Book, Long> { }Defining the Service
In a classic three-tier-architecture, you normally do not access a repository directly from your endpoint. This is in order to isolate the different levels of the application from each other, which is generally good practice. Instead, you access the database through a service class.
Let’s create this class now, and call it, unsurprisingly, “BookService.java”. Here is the code for it:
@Service
public class BookService {

    @Autowired
    private BookRepository bookRepository;

    public List<Book> getAllBooks() {
        return bookRepository.findAll();
    }

    public Book getBookById(Long id) {
        return bookRepository.findById(id).orElse(null);
    }

    public void deleteBook(Long id) {
        bookRepository.deleteById(id);
    }
}
All in all, we have three methods, one for getting all books, one to find a book by id, and one to delete a book from the database. But wait a minute, we never implemented those methods we are calling here in our BookRepository.java! In fact, our repository class is only an empty one-liner interface!
This is another nice feature of Spring Boot, and another example of the “convention over configuration”-philosophy. These methods will “just work” out-of-the-box without the need to implement anything. There are a lot of possibilities to access a database without actually having to write SQL.
Defining the Controller
Now the only thing left for our application is to make these methods accessible to the outside world. We will do so by creating a controller class that exposes three REST endpoints, one for each method:
@RestController
@RequestMapping("/api/books")
public class BookController {

    @Autowired
    private BookService bookService;

    @GetMapping
    public List<Book> getAllBooks() {
        return bookService.getAllBooks();
    }

    @GetMapping("/{id}")
    public Book getBookById(@PathVariable Long id) {
        return bookService.getBookById(id);
    }

    @DeleteMapping("/{id}")
    public void deleteBook(@PathVariable Long id) {
        bookService.deleteBook(id);
    }
}
Adding Data to the Database
Start the application again. Since we are using an in-memory database, it gets deleted every time the application is shut down. Therefore, first, we must add some data that we can then query through our endpoints.
You can do so by opening your browser to http://localhost:8080/h2-console. Use the data defined in application.properties to access the in-memory database. This opens another screen where you can run some SQL commands to populate the database with some books. Here are some inserts that you can use:
INSERT INTO BOOK VALUES(1, 'George Orwell', '1984');
INSERT INTO BOOK VALUES(2, 'J.R.R. Tolkien', 'The Lord of the Rings');
INSERT INTO BOOK VALUES(3, 'Franz Kafka', 'Metamorphosis');
In case that you (like me) find it cumbersome to have to repeat this step every time you restart the application, you can simply save these inserts into a file called data.sql and place it in the src/main/resources directory. Also, in application.properties, you will have to change the line
spring.datasource.url=jdbc:h2:mem:testdbTo
spring.datasource.url=jdbc:h2:file:./data/demoThey will now get executed automatically every time the application starts.
This is yet another good example of Spring Boot’s “Convention over Configuration” philosophy: You could, of course, configure a different filename and a different directory, but if you are content with these sensible defaults, it works right out of the box without having to hardly configure anything at all.
Testing the Application
Now that we have some data inserted into our database, we can test our endpoints. The easiest way to do this is by using a tool such as Postman, as it easily lets you try out the different http methods such as GET and DELETE. If you prefer the command line, curl might be your tool of choice.
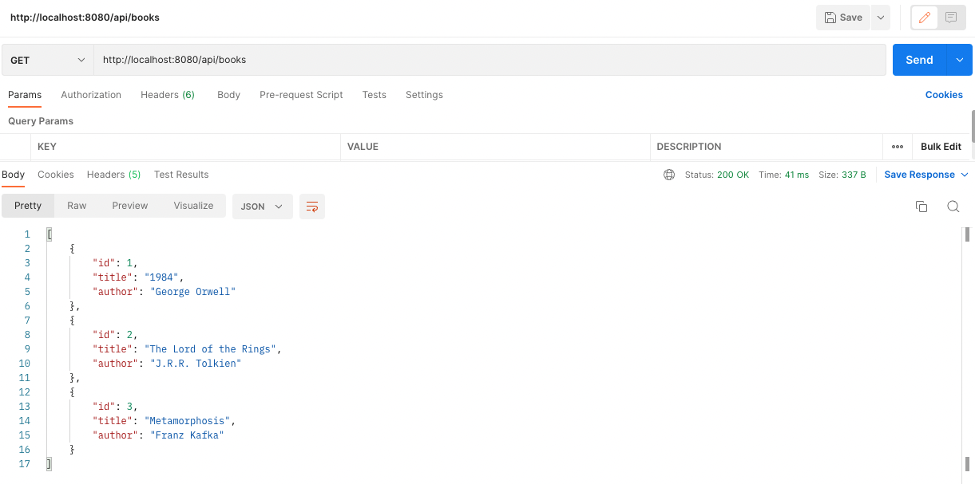
Making a GET request to http://localhost:8080/api/books should yield the following response:
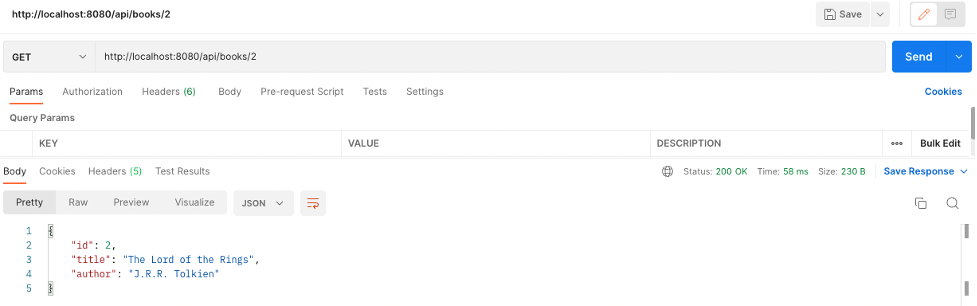
To only retrieve the book with id=2, call http://localhost:8080/api/books/2:
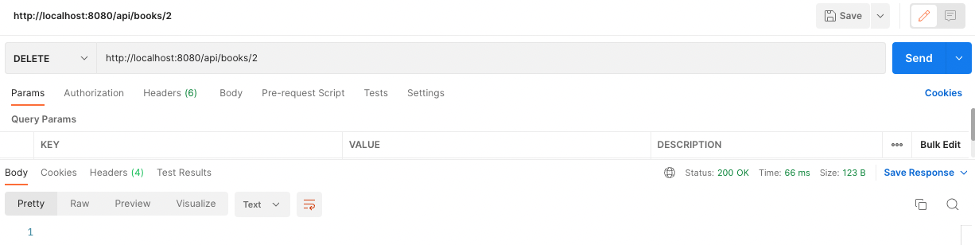
Let us now delete the book with id=2 from the database by making a DELETE request, and then again retrieving all books to make sure it is really gone:
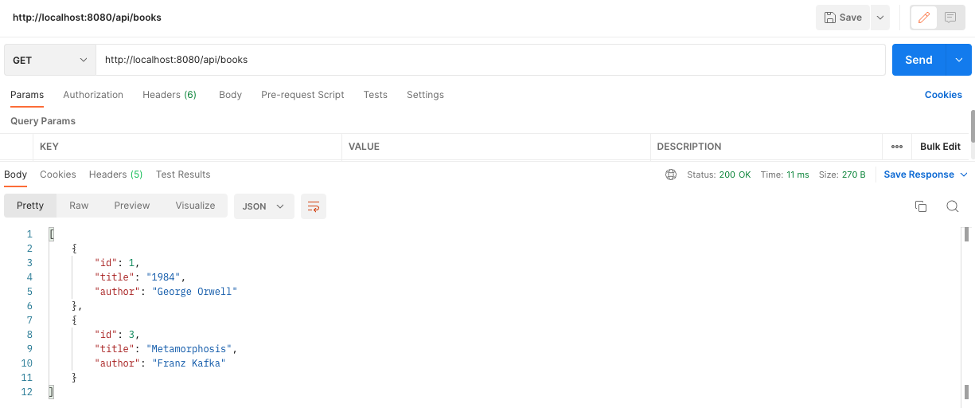
All done! As we have tested, our endpoints work as expected.
Of course, this little example is merely a proof of concept. It lacks security, testing, and of course a front end.
Conclusion
At WATA Factory, we have and are using Java for our backend in both internal and external projects. While it is often perceived as being more cumbersome and difficult to set up than, for example, Javascript-based alternatives like NodeJS, this article has shown with how few actual lines of code a working application server can be set up in order to start getting productive as fast as possible.